 For this “Ask an Artist”, we’re finding out if two minds are really better than one; exploring collaboration between two artists and sharing tips for making the project successful. To shed some light on this subject, we picked the brains of our own Rebeca Mojica and a long-time friend, fellow artist and recent collaborator of hers, metalsmith Sarah Chapman. Talking with the two of them, we really got an feel for how much fun collaborating with another person can be (especially if you get along as well as they do!) Read on to get some insight into their experience as well as pick up some advice on how you can make your craft time into a collaborative experience.
The more the merrier!
How did you two meet?

Sarah Chapman (right): I was teaching at Caravan Beads in Chicago and Rebeca took a class with me. I think it was a wire wrapping class – more then ten years ago (yikes)!
Rebeca Mojica (left): Yep, that’s right. I had made my first chainmaille piece (a belt) and was dissatisfied with my closure, which was just a big ol’ safety pin. So I signed up for Sarah’s class with the goal of learning how to forge a custom clasp. It was the summer of 2002.
I was so impressed during class when Sarah said that this is what she does for a living. She was one of my inspirations for starting my own business! (Oh, and by the way, she is a terrific instructor, and I highly recommend any class with her! OK, I think I’m making her blush, so I’ll move on!)
SC: Yes, I’m definitely blushing! Thank you!
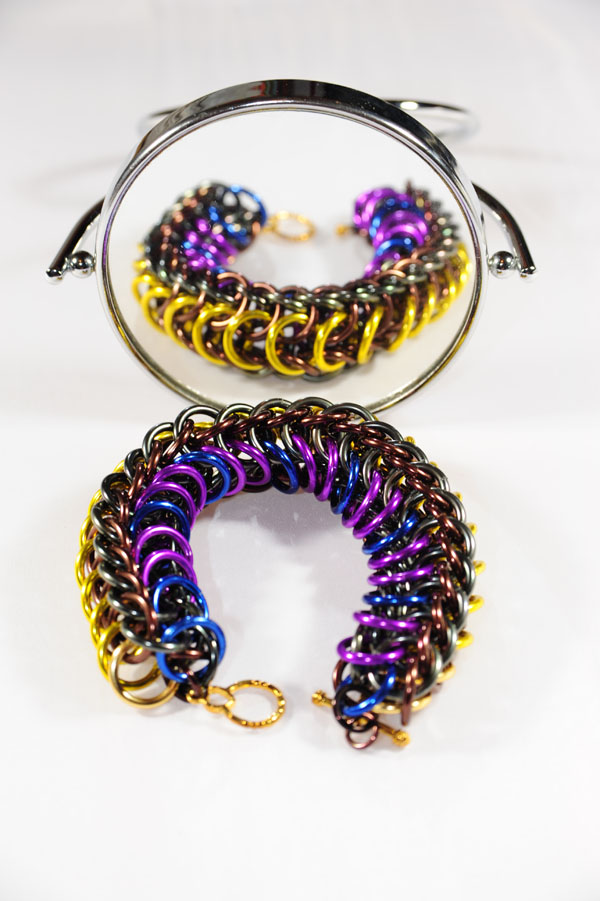
How did the collaboration on the cuff (shown above and left) come about?
 RM: A customer contacted me with a very specific request. He wanted a cuff like the 24-gauge micromaille cuff, only wider. He also wanted it to be super-durable. I convinced him that we should bump the gauge up a bit in order to increase the durability. It would still be thin enough (22 gauge) to allow for that mithril-fabric look he was going for.
He also wanted a clasp that was simple and did not deter from the chainmaille. The clasp, however, should span the entire 3-inch width of the piece.
I researched pre-made slide clasps, but I did not come across any stainless steel or sterling silver clasps of that width. I did find a couple of silver-plated clasps, but I felt a plated clasp would be a poor choice to use when the rest of the bracelet was going to be so spectacular, and the customer agreed. After further pondering, it suddenly dawned on me that a hand-made clasp might be our only option. I proposed that to the client, suggesting both a wireworked clasp as well as a metalsmithed clasp as options. He was intrigued and excited by the idea and opted to explore a metalsmith-ed clasp.
Um, is metalsmithed even a word…?
SC: Ok, I just looked it up – nope, not a word but we shouldn’t let that stop us from using it.
RM: [Laughs] Ok, great! Anyway, Sarah instantly popped into my head because we’d talked a few years back about a collaboration, but not having a particular project nor client in mind, we never actually sat down to work out any details. So this was the perfect opportunity.
How did you know this could be a successful collaboration?
 SC: Having known Rebeca for years and see her build her jump ring empire, I knew she had a strong work ethic, and design sense – and that it would be fun! Also, it just so happened that I had some ideas for a more complicated clasp but didn’t have the project or the time to work on it on my own.
RM: Remember what I said before about Sarah being a great instructor? Some of the things that make her a great instructor–her expertise, her patience and her ability to problem-solve on the spot–were things I knew would make for a good working relationship.
SC: Maybe it’s a bit of a cliche, but communication really is the key. Rebeca definitely had the harder part of the job communicating between me and her client and back again. The measurements for this piece were crucial, besides going back and forth with designs we spent a lot of time making sure the size would be dead on.
I really was amazed at how well Rebeca could make her points clear via email-not a strong suit of my own!
 RM: Aww, thanks, Sarah!
I knew as soon as we had our initial meeting (following a couple of email debriefs) we were going to be successful. Sarah came to this meeting with some sketches which blew me away. She’d thought of things that I hadn’t thought of, both in terms of design and functionality.
We had a great synergy as we explored various options. Two brains really are SO much better than one!
Did you use any technology to enable your collaboration (Skype, etc.)?
SC: We did a fair amount of sending photos back and forth through email, but that was the extent of the techno part.
RM: Yep. We met a couple of times in person, which I think was crucial for this project, especially for some visually and kinesthetically oriented folks like us.
Sarah moved to Minneapolis – how do you think you would approach a long distance collaboration?
SC: A lot more emailing and strange iphone photos!!
RM: Oh, man, yeah, if we couldn’t meet in person, we might need to Skype. Sometimes it is just so much easier to hold something up and say “Piece A needs to go right here, so that Piece B can bend like this” than it is to type it all out by email.

You both work in metal but your techniques are very different, did you ever feel like you spoke different languages? How did you overcome that?
SC: Rebeca is fluent in both languages, she could translate the number-letter system she uses for jump rings into the gauge system that I’m used to using in metalsmithing.
RM: Ha, yep, it’s true – I speak SWG, AWG, metric and inch. Why oh why is that not a talent that comes in handy at parties? ;-P
Living in Chicago, there are lots of opportunities to meet other great artists, but what would you recommend for folks who live in more isolated locales? How can they connect with like-minded artists for collaborations?
SC: There are several good nationally based organizations; American Craft Council would be a good start if you want to connect with artists from different mediums. SNAG is a large organization for metalsmiths and jewelers and puts out a beautiful magazine Metalsmith and organizes yearly conferences across the country.
RM: There are also lots of online forums and communities. Join a couple – lurk for a few weeks to see which ones you like best and where you seem to “fit” in. As you start to post, you’ll make virtual friends, and develop a network of folks that you can approach regarding collaborations.
 We’re not all in a place to be collaborating on epic commission works, how can crafters and hobbyists integrate the practice of collaboration into their creative lives?
SC: Get some friends together for a craft night or to help with a bigger project you have in mind (build a bookshelf, bake 100 cupcakes). Then return the favor and help other friends with their overwhelming projects.
RM: Agreed. And you can even work on non-traditional crafts. For instance, a few weeks ago, I helped a friend of mine create a tiled backsplash for her kitchen. I love what I do at work, but it was so fun to be doing something handy and creative that had nothing to do with my work. At the end of it all, even though it wasn’t my kitchen, I still had an enormous sense of satisfaction. She and I agreed to get together every couple of months to tackle various home improvement projects like this at our homes. I am so looking forward to it!
Learn more about Sarah Chapman:
Sarah’s website: www.chapmanmetals.com
Sarah’s page on Facebook: www.facebook.com/ChapmanMetals
Learn more about Rebeca Mojica:
Rebeca’s website: rebecamojica.com
Rebeca’s page on Facebook: www.facebook.com/rebecamojicajewelry


