Three Jewelry Artists Share What Works For Them
NOTE: This article is part of Blue Buddha’s series: Behind the Scenes at a Craft Fair. Check out the other articles for even more advice on how to rock your show!
So you’ve been accepted into a craft show – yay you! But now what? You want your booth to rock and show off all your hard work but maybe you’re not quite sure how to do that. How many tables should I get? Do I need curtains? What about displays? It’s enough to make your head spin.
The truth is, finding the perfect booth setup takes a good amount of trial and error and what works at one show might not work at another. That said, you can learn a lot by asking other artists and even making the rounds during a break – seeing what ideas you like (and might want to steal!) and noticing what doesn’t seem to work. Below, we asked 3 show veterans to share their tips for making their craft show booths rock. We hope this helps show newbies get an idea of what they need to get started.
Have questions? Leave them in the comments or shoot us an email at [email protected]. Happy Showing!
KAT WISNIEWSKI
Elemental Art Jewelry
Setting up your both….when you need to fill a 10′ x 10′ Booth (click photos for larger views)
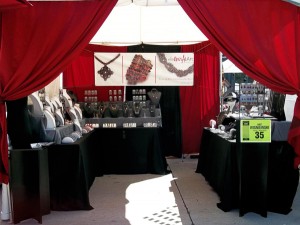
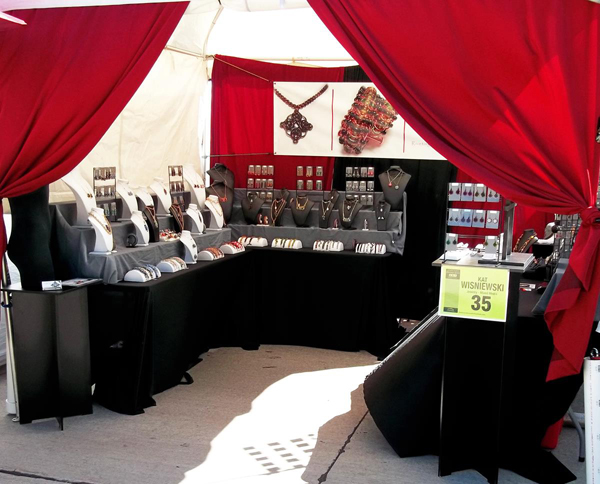
TIPS FROM KAT: To make my booth my own, I use curtains that match my logo colors and touch the ground all along the back wall. They are weighted own with zinc dowel rods to keep them straight and not flying around in the wind. I also have front curtains. These go a long way to creating a warm, inviting entrance – like having your own little shop window among the many vendors! I attach these curtains to the front poles of the tent so they don’t blow in the wind either.
For jewelry display, I use three 6ft tables and three 15″ x 15″ black display pedestals with varying heights. I have one 6′ x 2′ vinyl banner
In leatherette displays I have:
25 white & 25 black neckforms
8 white half moon bracelet displays
2 white t-bar and 2 black t-bar displays
6 black metal earring racks
2 acrylic/black earring spinners
Everything is arranged by color fade and not collection. I used to group it by collection but realized that I could sell a lot more by organizing it by color groups– which worked! I have a small section dedicated to sale items in the back of the booth. In the front on one side, I put one large mannequin with a hat, belt and large long necklaces. In the front on the opposite side, I lead with my Rubber Bloom collection. These are really bright and colorful rubber & enameled copper pendants, earrings & rings that have a low price point. I usually sell out of these at every show, so it seems to be working. I have around 150 pairs of earrings at each show as those always sell the best. I have more bracelets than pendants out usually.
Visit Elemental Art Jewelry’s page on Facebook, Twitter feed or website for more!
SARA RICHARDSON
Lovestruck Jewelry
Setting up your both….when you’ve only got a table. (click photo for larger view)
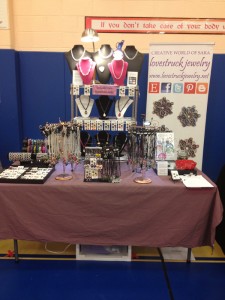 Since I usually only have room for one table at most of the shows I do, I find “building up” a good technique. I bought the silver wire rack in the middle from Target. It was the perfect size for my necklace displays…which tend to have the most “wow” factor, and draws a lot of attention. I can also hang earring cards from the rack’s edges to bring more attention to earrings, which are sometimes skimmed over. Since some of my displays are tall and can hide other items, I found this to be a great solution. It also allows me a little more flexibility to arrange my table and fit everything on it!
Visit Lovestruck Jewelry’s page on Facebook, Twitter feed or website for more!
DARLENE OSTROWSKI
Do Bats Eat Cats
Setting up your both….when your space is somewhere in the middle. (click photos for larger views)
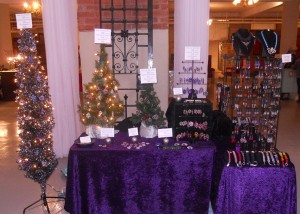
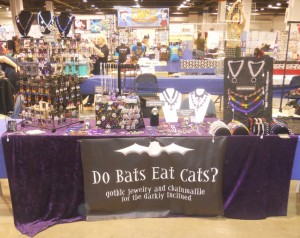
If I get an actual booth space (i.e., not just one table), I usually like to set up my tables in a “U” or “L” shape, to maximize the space I’ve been given. Sometimes, though, shoppers seem unwilling to step INTO a booth rather than just walking past it. So I always put something really eye-catching at the end of the “U” or “L,” right at the aisle where shoppers are walking by. You want it to be right in their face so it gets their attention, even if they’re just doing a quick scan! This is usually my Goth Tree, covered in ornaments, if I’m doing a holiday show. It’s tall, black, and silver and most people haven’t ever seen a black tree before so it gets noticed! I often put my gridwall of earrings right at the aisle too, because they’re a best-seller for me and there’s just something about a big cube covered in shiny, sparkly things that seems to make women stop and look.
I am unnaturally in love with this portable and collapsible gridwall for displaying earrings, which I’ve been using for about a year now at my shows. You can arrange it any way you want and get a great deal of height from it, without having to haul big displays. (I don’t have a car so compact displays that I can carry onto public transportation is key!) I clip my earring cards to the grid. Best of all — it has proven to be windproof during outdoor shows, especially if I C-clamp it to my table. No more flying earrings when it gets stormy! You can get it at Target or other stores that sell home organization stuff.
You’ll see as the show progresses how people are moving through your booth and what they are noticing and buying (or not). Be flexible with your display — what worked at one show might not work as well at another (you can see how my both layout is different in each picture above), and it’s totally OK to rearrange or move things in the middle of a show. If you’ve got a normally popular item that isn’t selling, try moving it to another part of the booth — closer to the aisle, farther away, near a different item. People might not be seeing it, for whatever reason.
Visit Do Bats Eat Cats’ page on Facebook, Twitter feed or website for more!
Have a great hint that we didn’t mention? Share it in the comments below! It’s great to learn what works in different parts of the country and the world 
This article is part of Blue Buddha’s series: Behind the Scenes at a Craft Fair.
